Table of Contents
NMR Control
Two digital oscilloscopes are dedicated to NMR readout – one for the analysis line NMRs and one for the spectrograph NMRs. The scopes are located in the S3 mezzanine. They are isolated from clean ground because the signals from the NMR probes are on a dirty ground.
Motivation
Due to the location of the NMR probes in the dipoles of both the S800 analysis line and spectrograph, the NMR signals are usually too small for the NMR module to lock on. This has been a long standing problem which required the users to manually search the resonance, a painful and lengthy process (especially at 3:00 AM!), as well as costly in beam time. The improvement made in 2001 was a remote control panel for the NMR modules that prevented the users from having to enter the vault in order to measure the fields and match the dipoles. Although it greatly shortened the amount of time and energy spent in performing those tasks, it still remained laborious compared to a fully autonomous system like the NMR program running on the A1900 for which the signals are strong enough for the module to lock on.
The solution implemented on the S800 uses digital oscilloscopes to digitize the NMR signal. The digitized signal is then used in a program that calculates the position of the resonance and deduces the value of the magnetic field. This program (written in Tcl/Tk) is fully autonomous and automatically writes the measured Brho values to the relevant EPICS channels. In addition, it offers the possibility to match the dipoles by pairs and keeps a log file of the measured fields.
Description
The NMR running programs for both the S800 analysis line and spectrograph dipoles can be started by logging in to exp-s3-nmr.ftc (10.40.230.111) accessible from the EXP network, namely, from any computer connected to the EXP network,
$ ssh [your-user-name-on-EXP]@exp-s3-nmr -Y
and typing, for the analysis line dipoles
$ /usr/bin/wish8.6 /srv/s3-nmr/analysis/analysis.tcl
and for the spectrograph dipoles
$ /usr/bin/wish8.6 /srv/s3-nmr/spectrograph/spectrograph.tcl
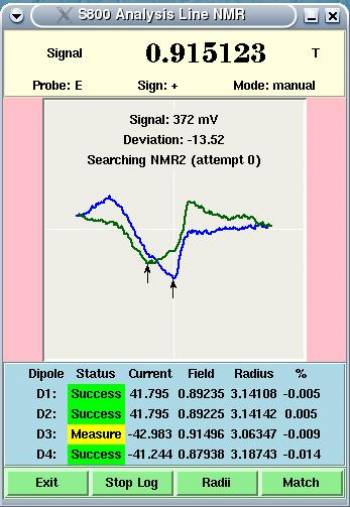
Note that it is not simply wish anymore but wish8.6. Now press start on the GUI, which is shown below, and you should see a field reading. Sometimes the initialization of these applications fail. In that case check section "Troubleshooting" below). The picture below shows the NMR panel for the S800 Analysis Line GUI as an example. The top (yellow) panel shows the data relevant to the NMR module, the middle (pink) the digitized signal from the oscilloscope and the bottom (blue) the status and measurements for the dipoles.
Terminating processes run by another user
A solution has been implemented for the case where one user needs to run the NMR software via the 'wish8.6' command, but another user is already running it.
If a user is running 'wish8.6' (usually 2 processes, one for analysis and one for spectrograph) and another user needs to run it instead, they can do the following:
- Log on to exp-s3-nmr virtual machine (as described above)
- Type 'ps aux | grep wish8.6' to find out the name of the user that is running wish8.6
- Let's suppose user 'alice' is running wish8.6 and user 'bob' needed to run it instead. That being the case, user 'bob' should type the command: 'sudo -u alice pkill wish8.6'
- This will stop both wish8.6 processes that are running as user 'alice' (the important thing to remember is that the username that goes after the -u is the name of the user whose wish8.6 processes you want to stop)
- Now user 'bob' can successfully start wish8.6 processes
In short,
$ ps aux | grep wish8.6
$ sudo -u usernameRunningWish8.6 pkill wish8.6
and you should be able to run the NMR software.
Operation
The NMR program constantly checks the status of the various dipoles from the EPICS system and updates the status column. In addition, the program checks the log file at startup for the closest previously measured value. In case no previous measurement can be used the program searches for a signal around the guessed value of the field. This search can take some time if the calibration is off or the hysteresis of the dipole is large. The maximum number of attempts is limited to 200. After that the status is marked as “Failed” and the program gives up on this dipole.
In order to reduce the searching time, the program tries to guess the field from the following sources, in priority order:
- Previous measurement if the current hasn't changed
- Extrapolation from previous measurement if the change in current is within ±5%
- Calibration if no previous measurement is available
Once a signal is found, the measuring sequence tries to find two resonance positions on either side of 0. Each resonance is calculated as the average between the negative and positive modulation minima (blue and green curves, and corresponding arrows). The final field is interpolated from those measurements, simulating a lock on the NMR signal.
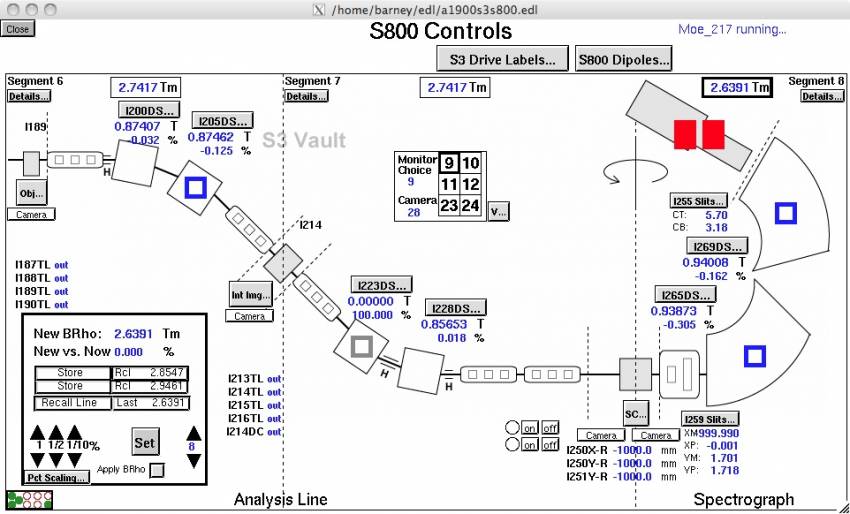
If a dipole is turned off or its field is being changed, the status shows either “Off” or “Unstable” and the program issues a beep. If this happens under running condition in data-taking mode, stop the beam and ask the operator to assist you in investigating the situation of the magnet giving the problem. The operators have the possibility to check on all magnet power supplies and helium fill levels in the control room. A magnet current below the set value, for example, is indicated in Barney as a blue circle on the respective optics element. In the figure below, the S800 Barney page with all magnets operational is shown. The grey square in the third dipole of the analysis line indicates that the system is trying to read the current of the magnet. The blue squares in the second dipole of the analysis line and the two dipoles of the spectrograph indicate that the read and desired current values differ by more than 0.1%.
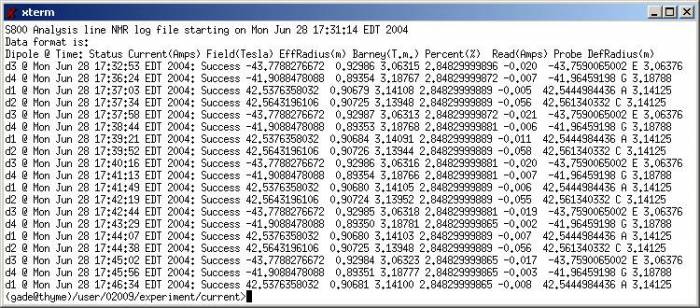
The magnet currents, measured fields, and deviation from the set value are logged in a file that is soft-linked from the “current run” directory. An example of the log file (analysis.log) for the four dipoles of the analysis line is shown below.
Matching
The button labeled “Match” opens a new window for matching the dipoles by pairs (see picture below). The user has the possibility to match the dipoles to either Barney or to the average calculated from the present measurements. This last function is useful when the dipoles have been tweaked to adjust the position of the beam, leading to an unmatched pair of dipoles. Since matching the dipoles involves changing their fields, it is necessary to wait for the measuring loop to go over each dipole before the effect of matching can be observed.
Troubleshooting
NMR GUI does not start
The NMR program is connected to the following devices and systems:
- The NMR module through a terminal server
- The digital oscilloscope through a terminal server
- The EPICS system through the caRepeater process launched by the et_wish shell running the program
Any of these connections can eventually be broken, and the program tries to catch the failures and report them to the user. However there are cases when the program “hangs” and need to be manually aborted. The little heart displayed at the top left corner of the oscilloscope display indicates the liveliness of the EPICS loop, as well as the liveliness of the program itself. If the heart stops beating for more than 10 seconds, it probably means the program is frozen. To restart it, simply click on the program's icon again, which will kill the existing process and start a new one.
In case nothing happens after clicking on the icon, the connection to the NMR module is probably locked and needs to be freed. To free it, type the following from any shell window (actual typing show in bold font):
- telnet s800ts.nscl.msu.edu
- Enter any username
- set priv
- The system will ask you the password (“system”)
- unattach port x (where x=1 for the analysis line and x=2 for the spectrograph)
- logout
- Click again on the starting icon and the program should start.
NMR GUI does not communicate with NMR controllers
- This can be seen, for instance, when the NMR controller finds a resonance, but the NMR GUI keeps trying forever.
- Most likely, you need to reboot the terminal server located in S3
- Go to the mezzanine level, where the NMR controllers are located
- The terminal server is behind the NMR controllers
- Simply turn it off, wait few seconds, and turn it back on
Error message: "/srv/s3/nmr-logs/spectrograph.log is not accessible"
- In a new terminal, ssh to yourname@exp-s3-nmr, then go to /srv/s3/nmr-logs/ and issue:
- mv spectrograph.log spectrograph-yourname.log
- Now close the error message window and you should not have this problem anymore.
NMR reading sometimes takes too long (> 30 min)
This is typically caused by one of two possible factors:
1. The signal is weak, and so the NMR “latches” on noise peaks. This is typically the case when the thresholds in the NMR GUI are not set properly. If they are too low, the program may lock in noise. Conversely, if the thresholds are too high, it may miss a weak resonance.
- This can be alleviated by changing the NMR thresholds (it can be done for each magnet in the analysis line, or for both magnets in the spectrograph).
- Stop NMR; enter new threshold (in Volts) and click “Set”; start NMR.
- In general, a threshold 0.15 mV is good for normal NMR signals, whereas 0.10 mV may be necessary if the signals are too weak.
2. Initial field where NMR starts scanning is far away from actual value (this has only been seen with Spectrograph)
- Check what field is NMR scanning and compare with field read by neighboring NMR.
- If it is too far, stop NMR; enter field (in T) and click “Set”; start NMR.
Manually setting Dipole Fields
(Based on notes from Mathias Steiner with some extra info included)
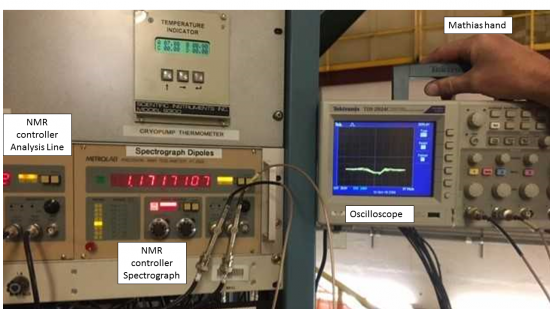
You will need to get access to the NMR controllers in the mezzanine level of S3 (see picture below). You will also have to connect an oscilloscope to one of the NMR controllers, either analysis line (left) or Spectrograph (right). Connect the left BNC connector (field modulation) to CH1 in the oscilloscope and the right BNC connector (NMR signal) in CH2. Select XY display, and AC coupling.
Let’s assume that you want to set the dipole I265DS (first dipole (D1) of S800 Spectrograph) to the rigidity (Brho) 3.7965 Tm (this works for any dipole in the S800)
Method 1
- Divide Brho by the dipole radius 2.8028m (you can see the nominal radius of each dipole in Barney) to determine the desired field (in Tesla). In this case, it will be 1.35454 T (or 13.5454 kG)
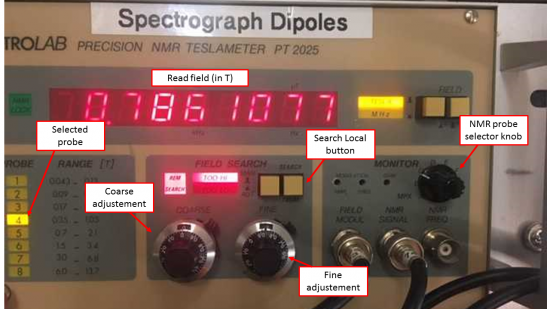
- Get access to the NMR controller in the mezzanine level of S3 vault (see figure below). Push the “SEARCH LOCAL” button to take control out of REMOTE mode.
- Select the right probe by turning the “probe knob” (see figure below). Remember, each dipole has two probes: probe 4, covers fields in the range 0.34 – 1.05 T, and probe 5 covers fields in the range 0.7–2.1 T. In this case, we should set the knob of the Spectrograph controller to position B
- The list of probes that can be selected with the knobs are, for the Spectrograph: A = dipole D1, probe 4; B= D1 probe #5; C=D2 #4; D=D2 #5. Analysis line: A = D1 #4 probe; B=D1 #5; C=D2 #4; D=D2 #5; E = D3 #4; F=D3 #5; G=D4 #4; H=D4 #5.
- Use the “coarse” and “fine” knobs to select the field that you want (in T): 1.35454 T. By doing this, you are asking the NMR controller to just look at that field.
- If the field of that dipole happens to be close enough to the field that the NMR controller is looking at, Bingo! You’ll most likely see a resonance in the oscilloscope. In the most likely situation, however, your magnet is far away from the NMR search window and you will see only a flat line in the oscilloscope.
- All you need to do now is to vary the magnetic field of your dipole, and drive it towards the value that the NMR controller is looking at. For instance, in the s800 computer u6pc5, open the QtKM file BLSetup_A1900.gkm (connected to the “knob box”) and use channel I265DS.
- As you get close to that value, the oscilloscope will show the NMR resonance. Keep moving until the resonance is well centered. At that point, your dipole is set to the desired field
Method 2
- Alternatively, you can force the dipole to its new field through the calibration in the control system. Note, the EPICS channel I265DS_MAG.BSVL [B field, set value] shows the magnetic field that corresponds to the set current – this way you can always know your approximate field for the current read from, e.g. EPICS channel I265DS.
- Set EPICS channel I265DS_MAG.BSET to 13.5454 (note, the default value of this channel is always an (impossible) 9999.1111, which is ignored. Typing 13.5454 will cause the magnet to go to 257.577 A, and I265DS_MAG.BSET goes back to 9999.1111. Setting the magnet this way will get you to plus or minus half a percent of where you want to be.
- At that point, the quickest way may be to use the FINE knob in the NMR controller to find the actual field value. Just turn the knob until the resonance is centered in the oscilloscope, and then read off the field value in the front panel of the controller.
- Once you know the value of the field, type it (in Tesla) into the EPICS channel I265DS_MAG.FELD. Note that this is what Daniel's NMR GUI program does whenever it finds the resonance.
- Having done that, you can use the BARNEY 'match' button to match the magnet.
- Repeat until satisfied.

